
|
I'm currently building a couple matching side tables using reclaimed hand hewn wood for the top and matching10x10s for the base. When it comes to working with reclaimed wood, it is rare that the material is flat or straight. Not to mention I cut the beams using a chainsaw, not exactly a precision tool for furnituremaking. The problem I ran into was the beam ends were not flat or even and they were not the same length. This would take too long to sand end grain white oak so I decided to build a jig for my router to assist this task.
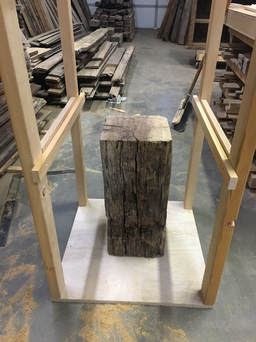
As floors aren't to be trusted for levelness, I started this jig by cutting two pieces of plywood that would act as the top and bottom. I wanted a jig that I could use for 8x8-12x12 and up to about 4' in length. I cut the plywood at 24"x24" to give me the adequate spacing needed. Next I ripped some 2x6s in half and cut them to length. I attached the plywood top and bottom with some screws. The frame seemed a little wobbly so I added some corner blocks to the frame for strength (I did this after the pictures were taken). 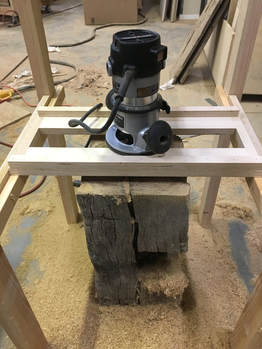
Next, I had to attach some side rails for the router sled to slide on. This step is easy. Just grab some straight material and clap/screw to the frame at your desired height. Add a bumper for the middle section of the rails so the router and sled dont slide off the rails. Note the picture above.
After building the rails, you need to build the sled for the router to rest on as you slide it back and forth. Start by grabbing some straight/flat material. I used scrap plywood for all this. You're essentially just building a frame with an appopriate opening for the router to move back and forth while resting on the sled. Note the picture showing the sled above. Make sure to add bumpers to prevent the router from cutting into the sled.

Now before you start routing away. Grab a framing square and see if your beam is leaning a certain way. If it is, grab some shims and shim it until it is perpindicular with the bottom. Now to begin routering. I used a 3/4" rabbet bit for this. You want to find your lowest point and make that your referencing point. If you have a lot of material to remove, you may have to do several passes. Once you have one end done, flip it over, remove the shims, and do the other end. You may have to lower your side rails. Once again, the low point would be your reference point, however, this project called for specific sizes so I just routered the material down to my final length. Building this jig could save you hours upon hours of sanding time.
2 Comments
|
AuthorMark Meulebroeck is the Owner/Creator behind Red Miter Furniture. We're based out of Prineville, OR. ArchivesCategories |
 RSS Feed
HoursM-F: 8am - 5pm
|
Telephone |
|
© Red Miter Furniture. All Rights Reserved.